It is widely known that there are two main directions in crypto: CeFi (Centralized Finance) and DeFi (Decentralized Finance). СeFi means that you keep your crypto on the exchange under your personal account, and your funds are stored in the exchange wallet. Optionally, the exchange may block your account, suspend the withdrawal of funds, or even provide the entire transaction history from your account at the regulator's request. Unfortunately, despite exchanges having a very user-friendly interface, they are associated with human risks and factors, which becomes a big minus for people who'd like to keep their crypto safe and secure. Indeed, it contradicts core crypto principles of equality and anonymity. Therefore, crypto go-getters rely on non-custodial wallets like MetaMask, taking the opportunity to store their assets without relying on any third-party institutions safely.
MetaMask is a decentralized cryptocurrency wallet, free-to-use web extension, and mobile app that allows you to interact with blockchain ecosystems Thus you can store and receive crypto, make transactions, and connect to various DEXs and apps. From this MetaMask crypto wallet review, you’ll get plenty of helpful info that will help you to get started with MetaMask.
What Is MetaMask? Is Metamask a Good Wallet?
MetaMask crypto wallet is one of the best-known wallets that makes Ethereum's dApp ecosystem accessible to a broad array of crypto enthusiasts. MetaMask bridges the gap between the user interfaces in the Ethereum network and the regular web browser or mobile app. Being first developed and released by ConsenSys as a Chrome and Firefox extension, it is now supported by a wide range of browsers, including Opera, Safari, Brave, and many others.
MetaMask is a cryptocurrency wallet that equips MetaMask users with the ability to transfer, swap, trade, and store ETH-based tokens such as ERC-20 and non-fungible tokens, also known as NFTs In addition, MetaMask users can interact with DEXs and dApps. Furthermore, ConsenSys has launched MetaMask for iOS and MetaMask extension for Android, making the Ethereum ecosystem accessible to all and one who is interested in the Ethereum network and DeFi anytime, anywhere.
By the way, Metamask supports not only Ethereum but many other networks, but we'll get to it later. Now we’ll go through the main features and benefits of the crypto wallet MetaMask, so settle in and let’s get started!
MetaMask Features
One of the critical MetaMask crypto wallet features that sets it apart from others and makes it one of the best Ethereum wallets is its outstanding encryption technology that securely stores passwords and private keys on any user's device. Apart from this, Metamask is also praised for its intuitive, minimalistic, and user-friendly UI. As a result, users often have no difficulty setting up or using the wallet. Moreover, this technology allows users to connect multiple wallets at once and easily switch between the Ethereum mainnet, multiple test networks, and even connect MetaMask to Binance Smart Chain (BSC), Polygon, Avalanche, Fantom, or other networks.
The main hallmark of Metamask is its flawless synergy with smart contracts and dApps. MetaMask allows you to connect to dApps through a browser or mobile extension, so you can conduct transactions without intermediaries and play games with a completely transparent code and the confidence that you are not being tricked.
Moreover, due to the recent MetaMask partnership with MoonPay, buying cryptocurrency has become much more manageable. Now you can purchase crypto with fiat directly from your MetaMask wallet using credit and debit cards, and through Apple Pay & Google Pay.
How To Use MetaMask?
Before we start delving deeper into all nuts and bolts of the MetaMask blockchain wallet, you need to install the right plugin for your browser first. MetaMask Wallet can be set in Google Chrome, Firefox, Edge, or Brave browsers at your discretion. It is also available for IOS and Android.
For this MetaMask wallet review, we'll be using the Google Chrome browser. Still, it should be noted that whether you use Chrome, Brave, or Firefox to install MetaMask, the process of installation and using remains the same.
So let’s start from the very beginning.
How To Install MetaMask For Chrome?
The installation process is quick and easy. To start using the MetaMask wallet at full blast, go to metamask.io first. The website will automatically detect your browser. Since we are using Google Chrome, clicking on the install MetaMask button must take us directly to the Chrome web store.

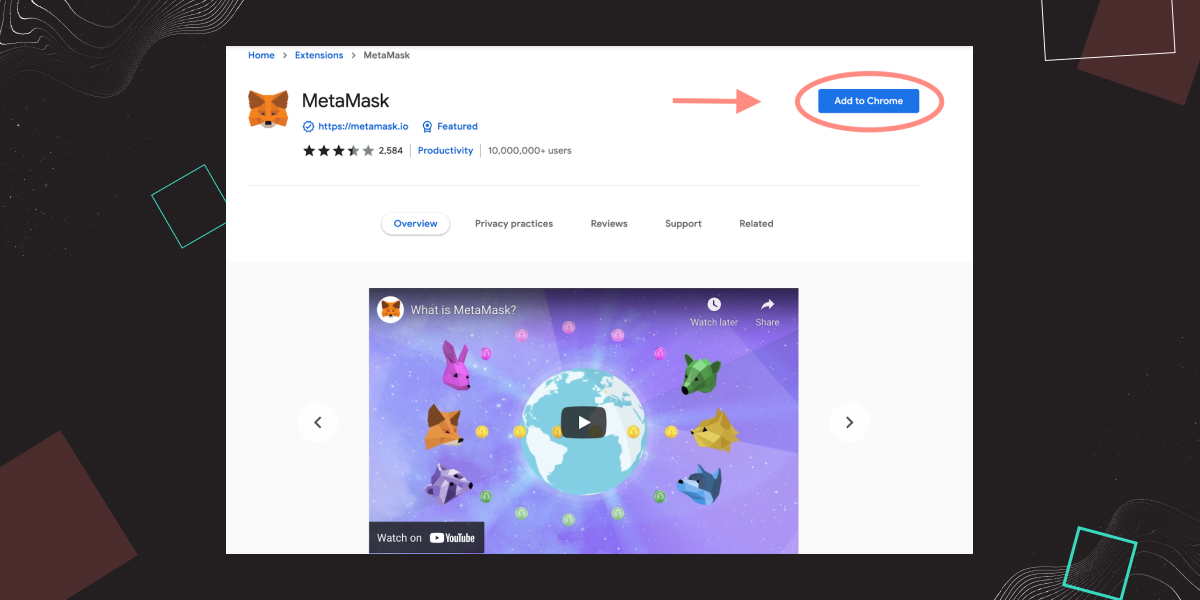
Once you click the “Add to Chrome” button, you’ll be prompted to add the extension. After you click “Add extension”, you’ll briefly see a download status at the bottom left of the browser, and then you’ll be redirected to the MetaMask setup page.
Now we'll step through creating your own MetaMask wallet and find out what the MetaMask seed phrase is and how to import a wallet to MetaMask if you already have one. Wheels up!
Create a Metamask Wallet: Step-by-step Guide
To create MetaMask wallet, follow these simple step-by-step instructions.
When we are done with the installation process, we are dropped to the Welcome page.
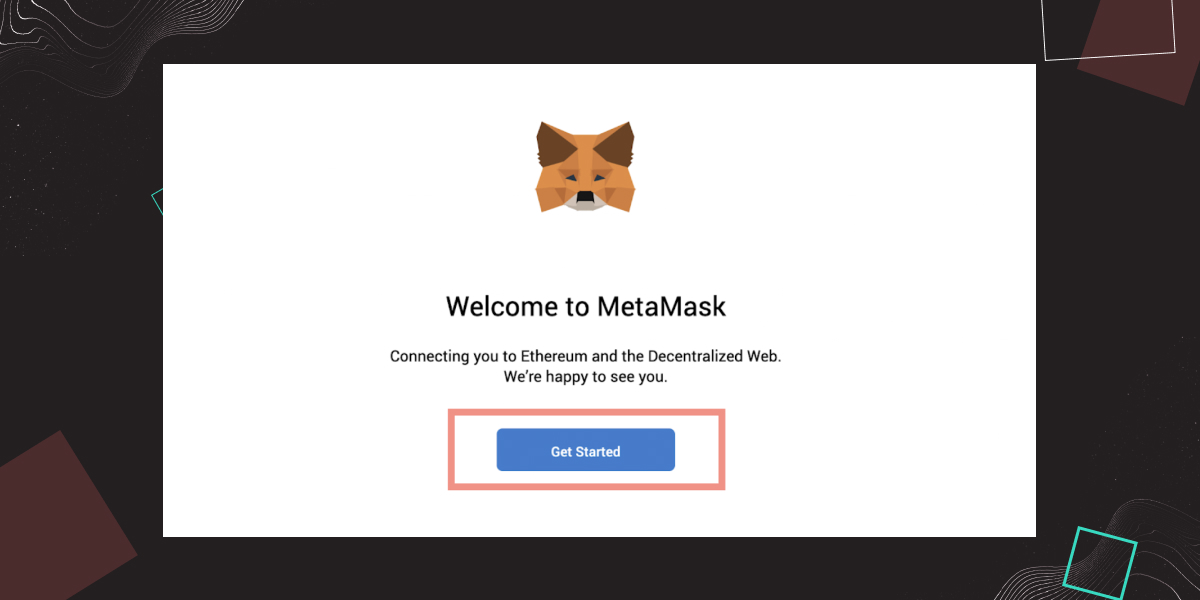
Click on the “Get Started” button to start your journey with MetaMask.
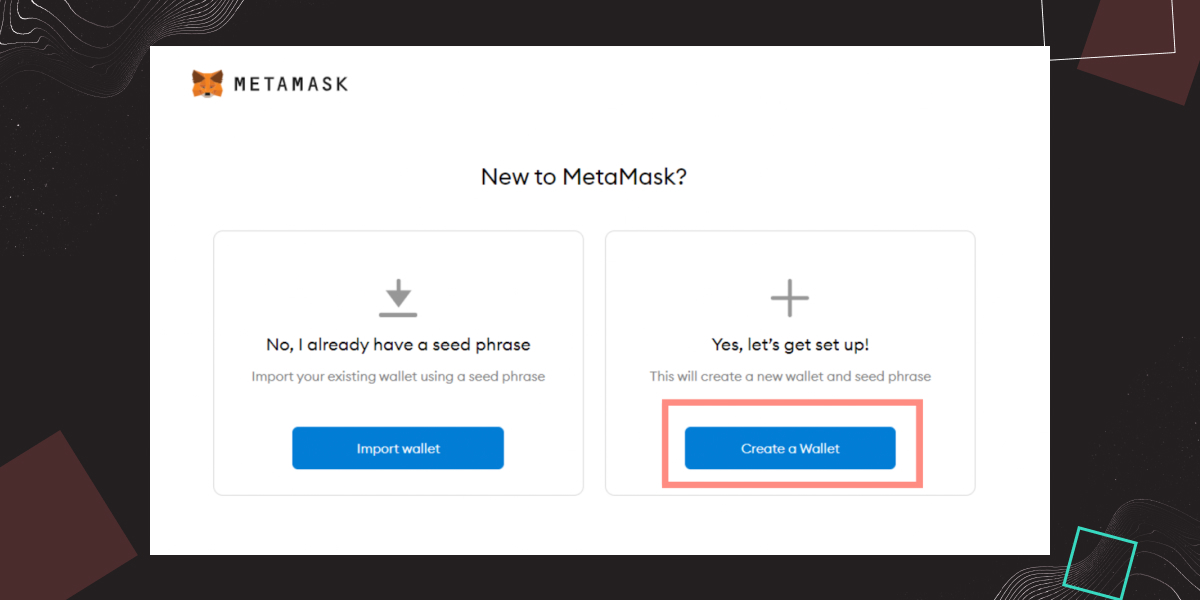
Since we don’t have a MetaMask wallet yet, we click “Create a Wallet” to go further.
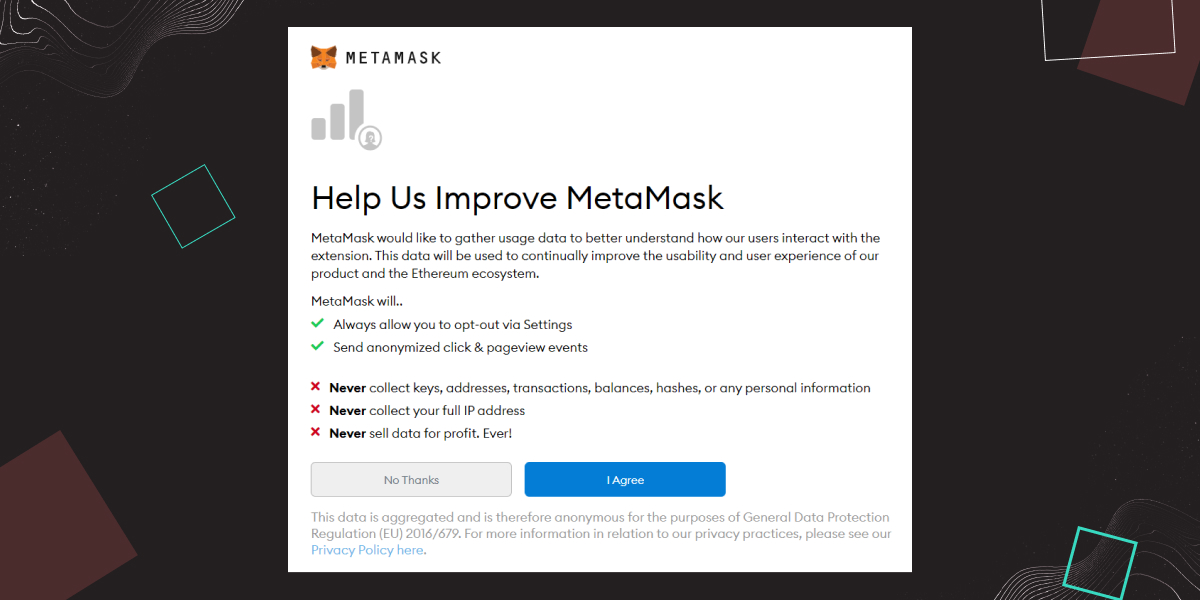
Next, you’ll see a page asking you about gathering your data for extension improvement purposes. If you’d like to keep your privacy, click “No Thanks”, but if you have nothing against it, click "I Agree” and go to the next page.
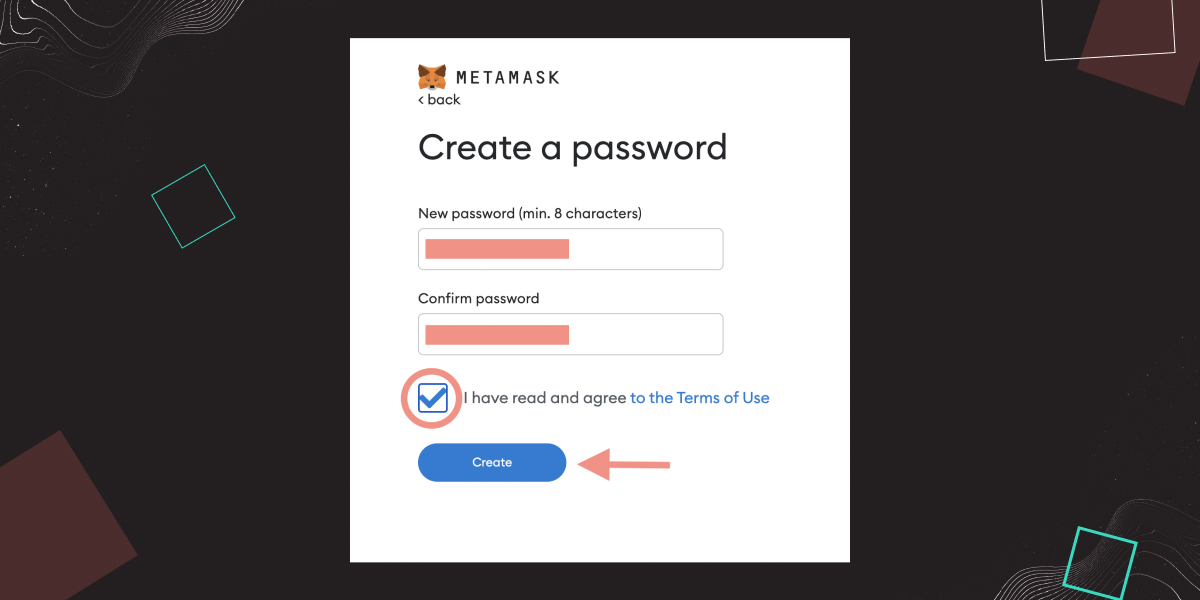
Set up a strong password with a minimum of eight characters, confirm it, check off the terms and conditions, and finally click on the “Create” button.


After all, you’ll see a Secret Backup Phrase window. But what does it mean? Let’s figure it out.
MetaMask Seed Phrase: What Is It?
MetaMask seed phrase is all about the security of your assets. On traditional websites, your accounts are managed and can be recovered by a central database. However, in MetaMask, all power is concentrated in the holder's hands. In simple words, whoever holds the MetaMask secret recovery phrase, also known as the seed phrase - rocks. MetaMask wallet seed phrase is a series of twelve terms generated once you initially set up MetaMask, and allows you to restore your wallet and funds if you ever lose access or connect to a new device.
You must secure your wallet by keeping your MetaMask secret phrase very safe and confidential because anyone who has access to it may easily take over all your assets. Therefore, you need to safeguard your secret recovery phrase and keep it in the strictest confidence.
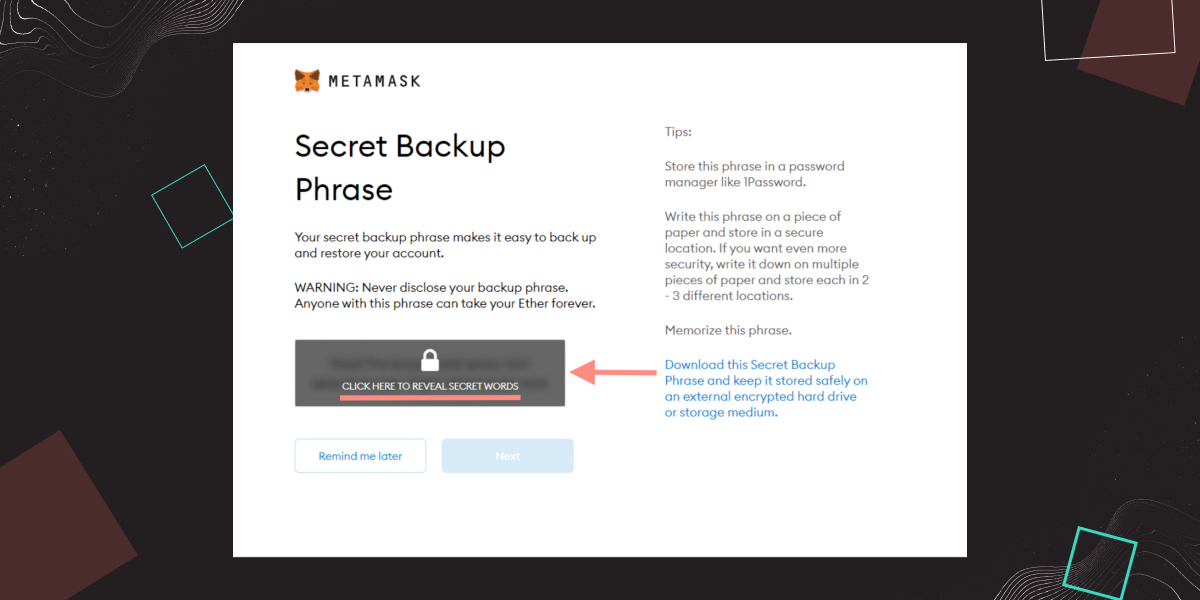
The page you see is the most important one, so pay very close attention.
The words you see when you click on “Reveal secret words” are your MetaMask wallet seed phrase. These words prove your ownership of your digital assets and allow you to make transactions. We urge you to write it down, put it in a safe place, or even use a secure password manager, at your preference.
Using these twelve random words, you’ll be able to recover your funds if anything ever happens to your computer, so don’t neglect our tips, and, again, don’t show them to anyone!
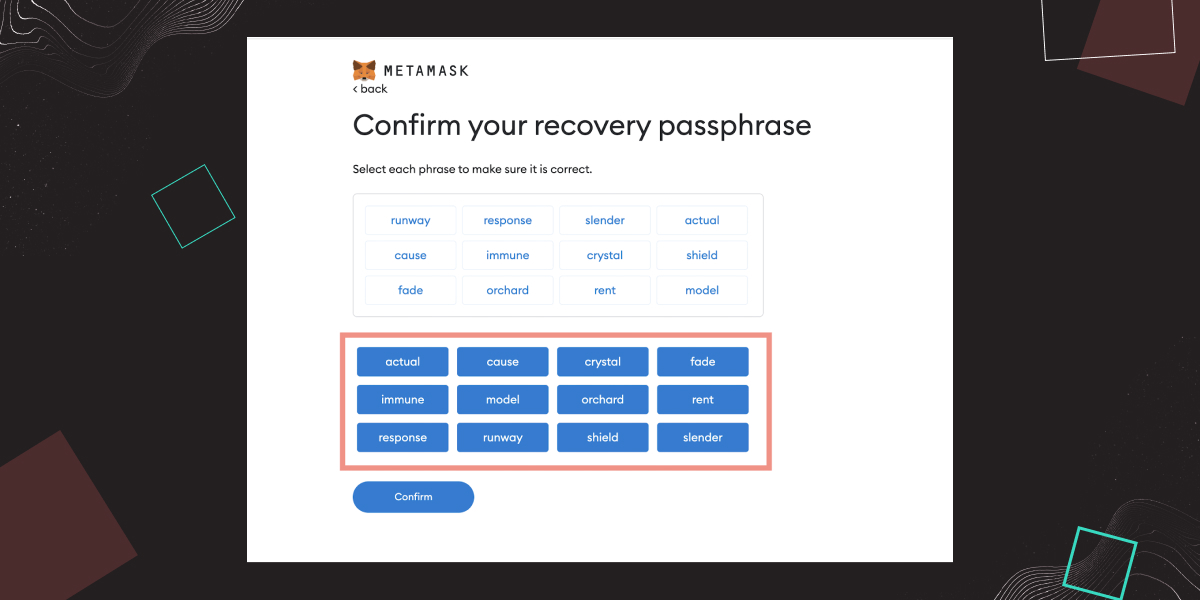
After you've written down your MetaMask recovery phrase and clicked "Next," you'll be asked to type it in again to ensure you got it right and activate the “Confirm” button.
Once you click “Confirm”, – your wallet will be created.
! Remember once and for all: Nobody, even MetaMask, won’t be able to help you if you lose words that your seed phrase consists of, so keep it safe. Never share your recovery seed phrase with anyone, so keep it secret and don’t allow anyone to scam you!
Now, that you know what a seed phrase is, and how to keep your wallet safe, you can move on to the next page.
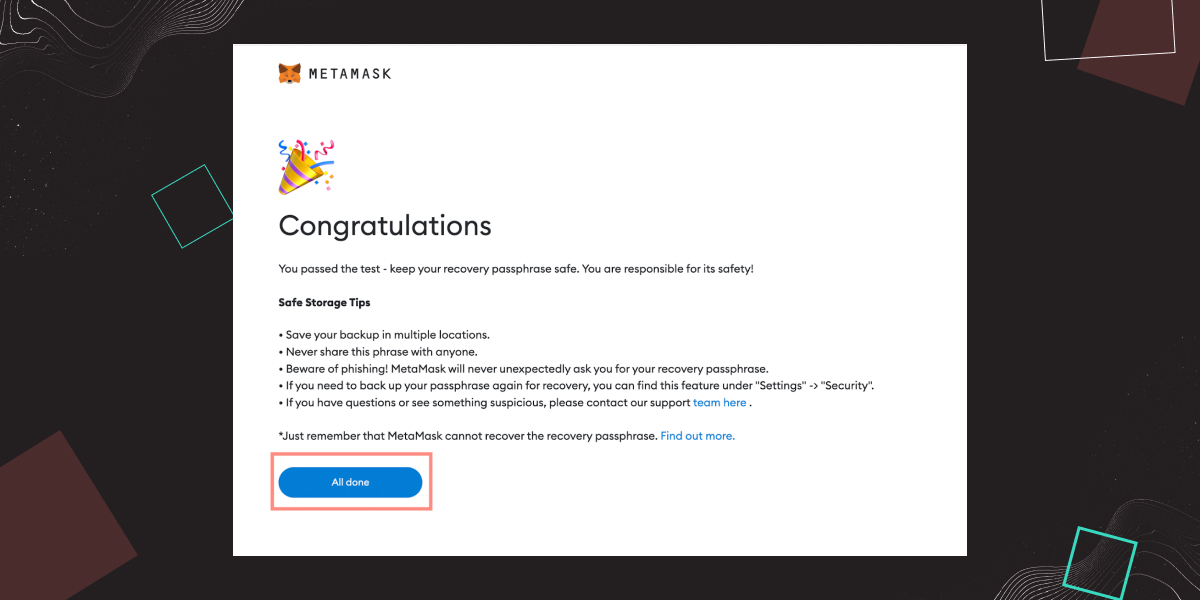
After these simple but essential steps, you'll see this lovely message that you are all set.
Now, we’ll see how to import your existing wallet with a seed phrase.
Import Wallet to Metamask
Maybe you smash your phone, so you can't access your MetaMask wallet, or you get a new PC after a power surge, and when you replace it, the wallet plugin no longer has your wallet info. Or maybe you don't have Internet on your PC, and you can only access the Internet from your phone. Then, you can import your wallet using the seed phrase to regain access and control of your crypto.
In a word, you can directly import your wallet to MetaMask with seed phrase to:
- Not create a new MetaMask wallet,
- Do not manually transfer your crypto to a Metamask wallet from an existing one,
- Not overpay commissions, etc.
If you have such a situation, then let's move on and figure out how to import a wallet to MetaMask using the example of Trust Wallet.
Import Trust Wallet To MetaMask
Now we’ll show you how to import Trust Wallet to MetaMask. It’s easier than ever!
Let’s say you have a Trust Wallet and now want to transfer Trust Wallet to MetaMask for any reason. All you need to do is just transfer the seed phrase from your Trust Wallet and add it to your MetaMask wallet.
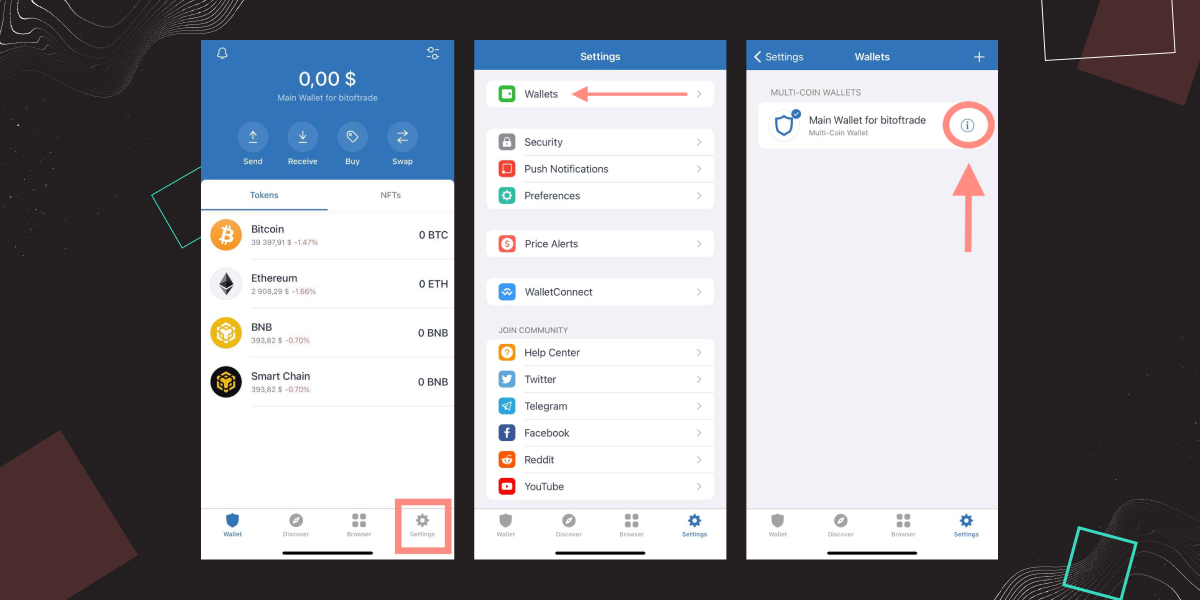
- Open your Trust Wallet — go to Settings — then Wallets,
- Now you can see a little "i" letter if you use the Trust Wallet dApp browser IOS. If you use Trust Wallet on Android, there will be three little dots. Press on them, and you'll get to your Wallet tab.
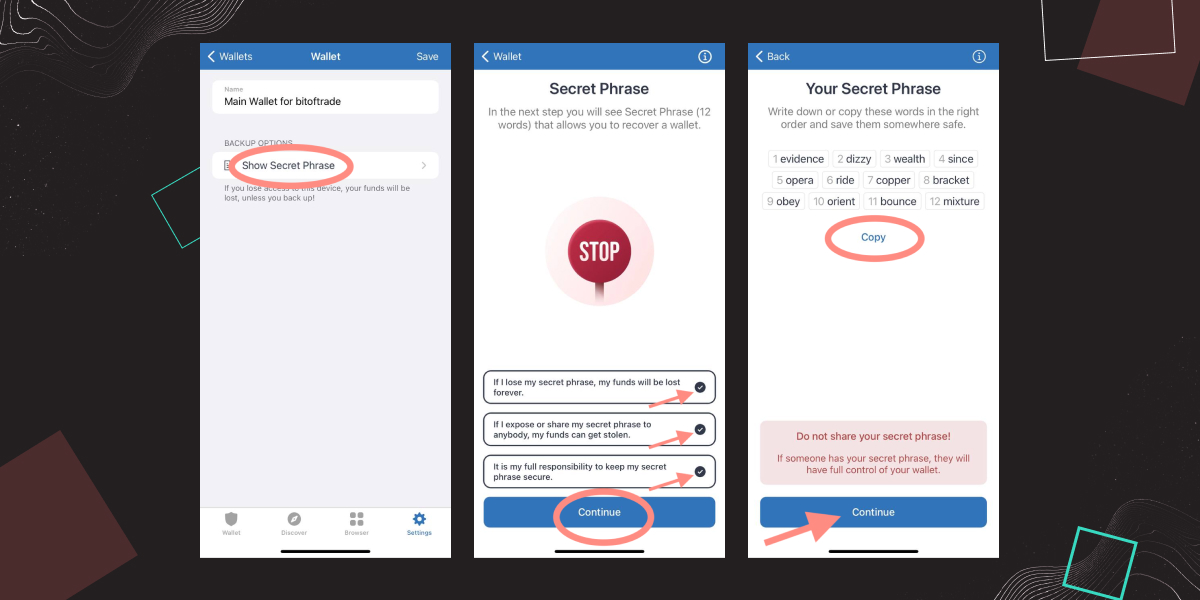
- In the Wallet tab, you’ll see the “Show Secret Phrase” option, press on it.
- Once you press, you will see three warnings, read them сarefully, and tick to go further.
! Next, for educational purposes, we will give you an example of a live secret recovery phrase from an empty wallet. You should NEVER share your secret seed phrase with anyone!
- You'll see your secret phrase consisting of twelve words on the next tab. Copy it and go to MetaMask to start importing your Trust Wallet.
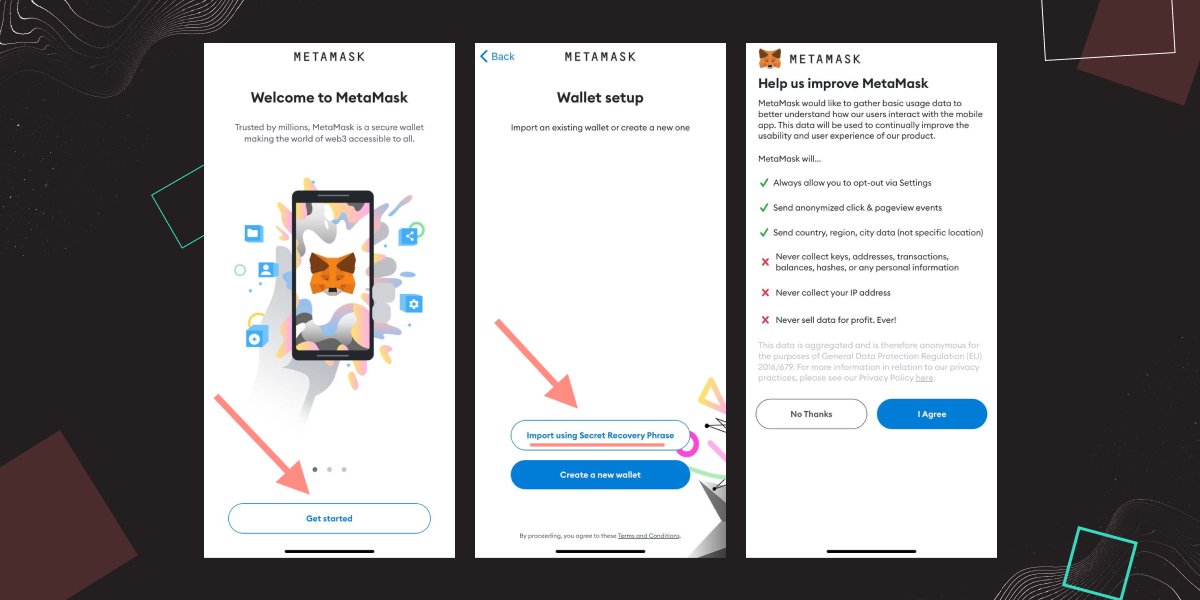
- Once you’ve opened it up, just press the “Get started” button,
- Then press the “Import using Secret Recovery Phrase” option,
- Next, you’ll see a page asking you about gathering your data for improvement purposes. If you’d like to keep your privacy, click the “No Thanks” button, but if you have nothing against it then click "I Agree” to continue.
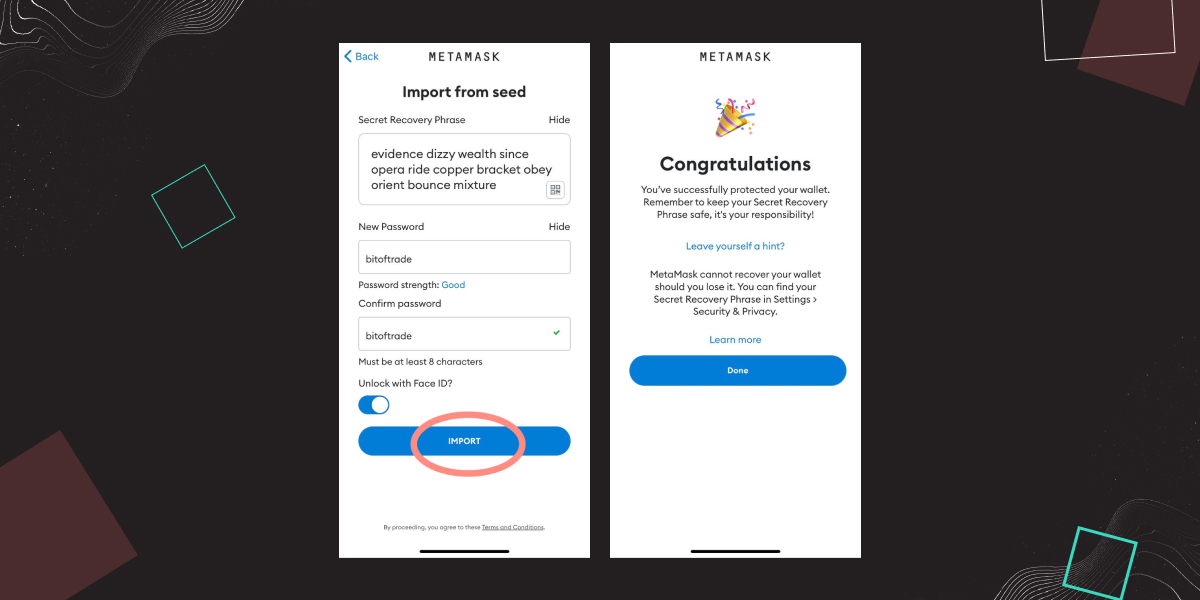
Next, you need to paste copied recovery phrase and come up with the password. Once everything is filled in, press “IMPORT”. That’s it! As we said quickly and easily.
You can see that Ethereum (ETH) is already added to your MetaMask wallet by default when you're done. But if you are wondering how to add ERC-20 tokens from the Ethereum blockchain on your MetaMask, the next section is just for you, so read on.
How to Add Tokens to Metamask?
As was mentioned before, Ether is added to your Metamask wallet by default. You won't need to pass this way to start withdrawing or depositing ETH tokens. Users can add ERC-20 tokens to the MetaMask assets tab manually. Now we'll show you the three most straightforward ways of adding tokens to MetaMask, and you'll choose the perfect one for you. Please note that no matter what chain doesn't matter, the process remains the same.
We'll go to coinmarketcap.com and then go over the search bar. Then, you have to search for the token you’d like to add. For this guide, we’ll randomly pick ApeCoin.
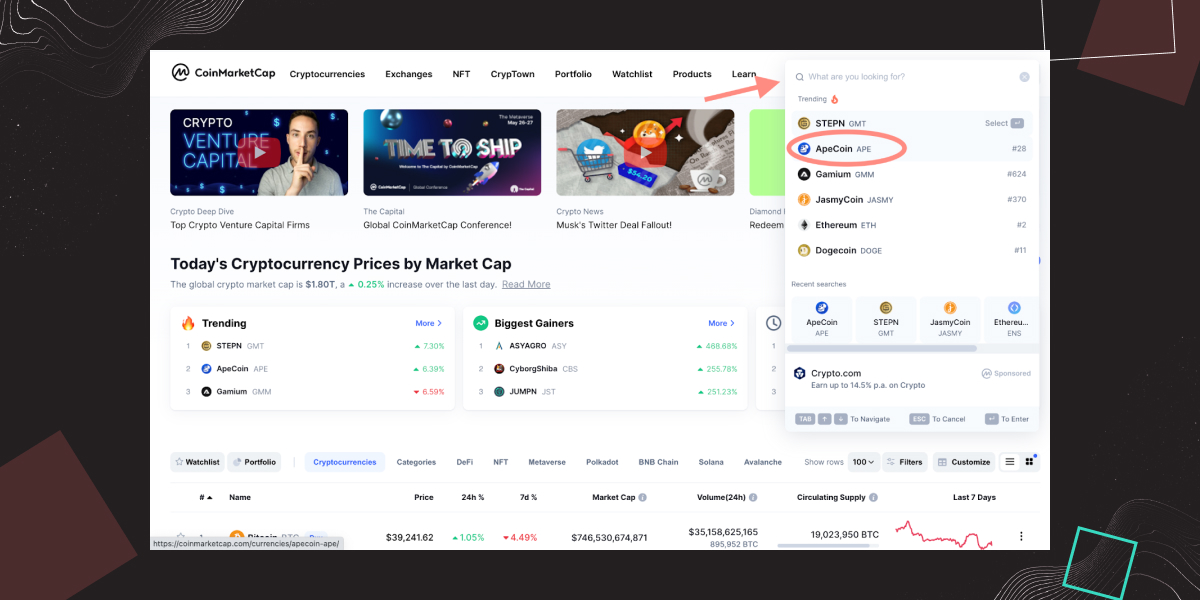

On the APE page, we must pay attention to the "Contracts", where you'll find a piece of important information: the Ethereum chain address. Then, all you have to do is click on that little fox icon. Once you click, the page redirects you to add your desired token.
But there is another way to import tokens to MetaMask.
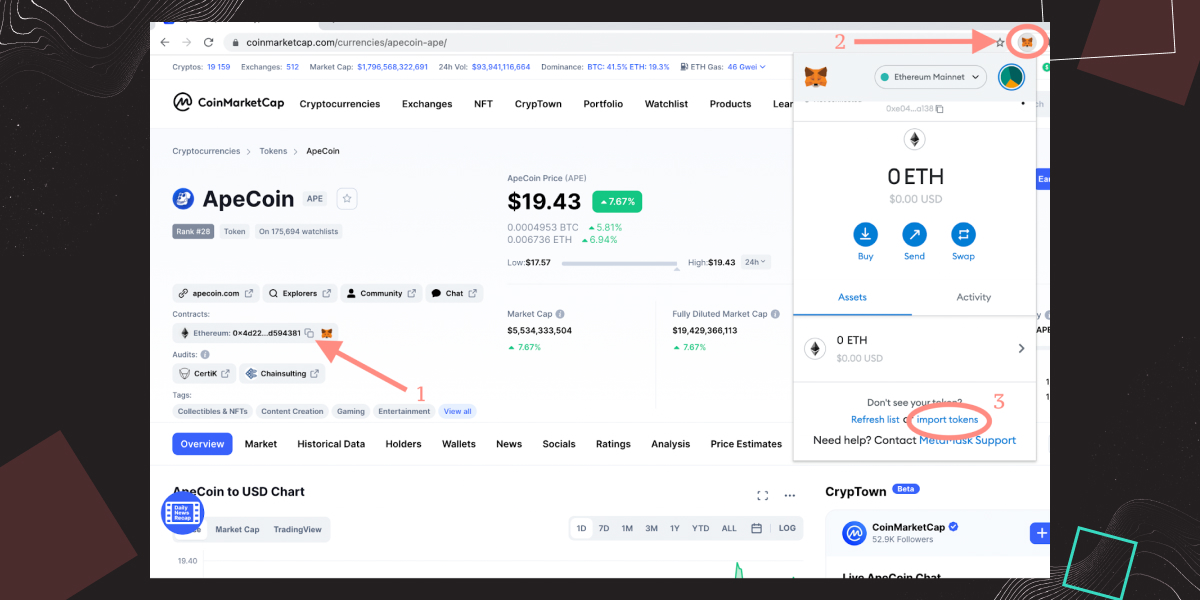
- Copy the Ethereum chain address.
- Click on the MetaMask icon in the upper right corner.
- If you have several networks on your MetaMask wallet just pick Ethereum Mainnet and then click Import tokens.
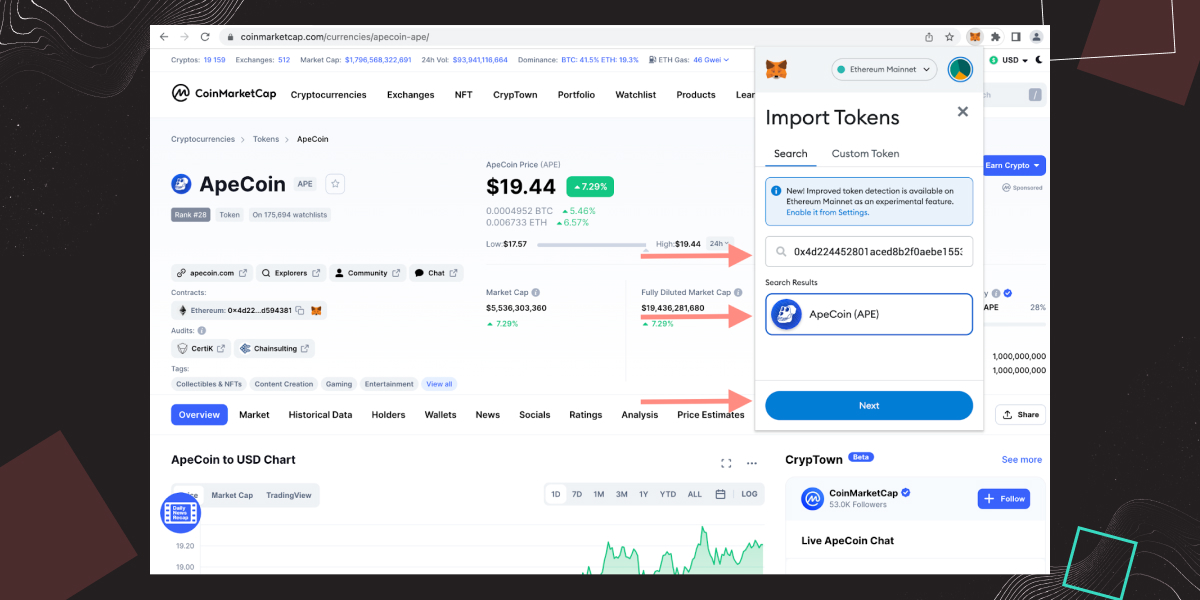
- Paste copied address in the search bar,
- Click on the token from the searching results, and go “Next”.
- Finally, click on the “Import Tokens” button to finish the proсess!
To show you the third way of adding tokens to MetaMask we at bitoftrade have prepared a video with detailed instructions and steps, so check it out in this link.
We believe the first way is much easier, but you can choose the best one. When we finish with tokens, let's move on to the networks and briefly show how to add some popular networks to MetaMask.
How to Add Networks to MetaMask
MetaMask is a decentralized cryptocurrency wallet that can connect to many tokens across multiple blockchains besides Ethereum. For example, Binance Smart Chain (BSC, Polygon, Avalanche, and other test networks) is also available in the MetaMask network based on Ethereum: Binance Smart Chain (BSC), Polygon, Fantom, or Avalanche.
Today we will show examples of adding the two most popular networks, Binance Smart Chain and Polygon so that you don't restrict your trading and investing opportunities exclusively to the Ethereum mainnet.
How to Add Binance Smart Chain To MetaMask
Trading on the Ethereum network is limited to ERC-20 tokens. To conduct transactions with BEP2 and BEP20 tokens, you need to experience the Binance Smart Chain network, which is currently one of the fastest intelligent contract platforms with low gas fees.
So here are the instructions on how to add BSC to MetaMask:
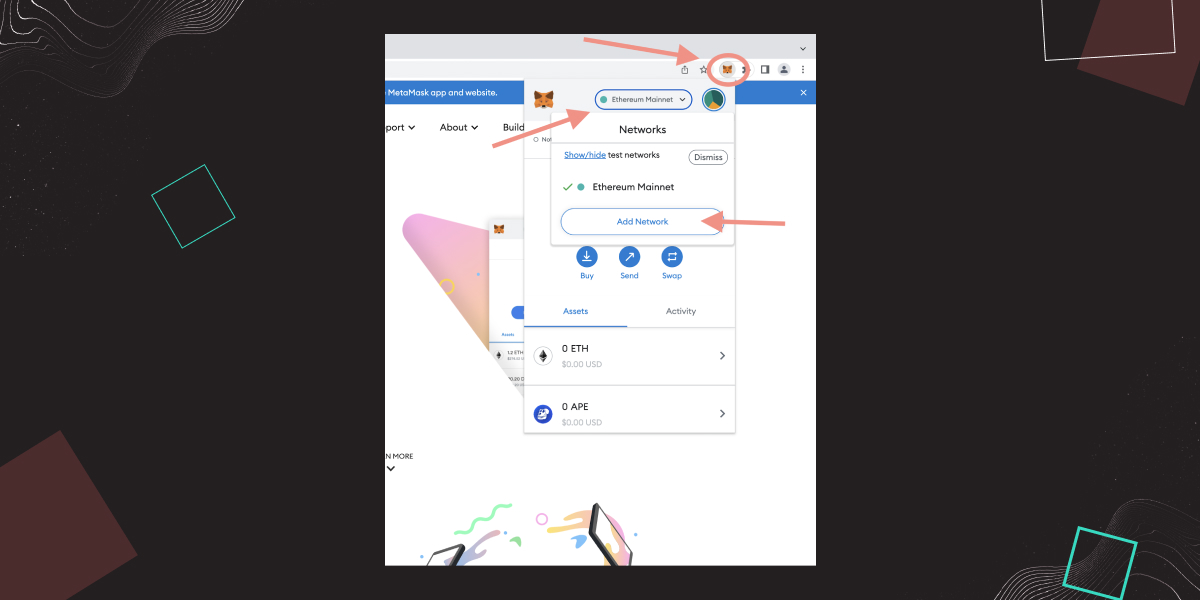
- First, open Metamask and click on the "Ethereum Mainnet" drop-down menu.
- Click on the “Add Network” button.
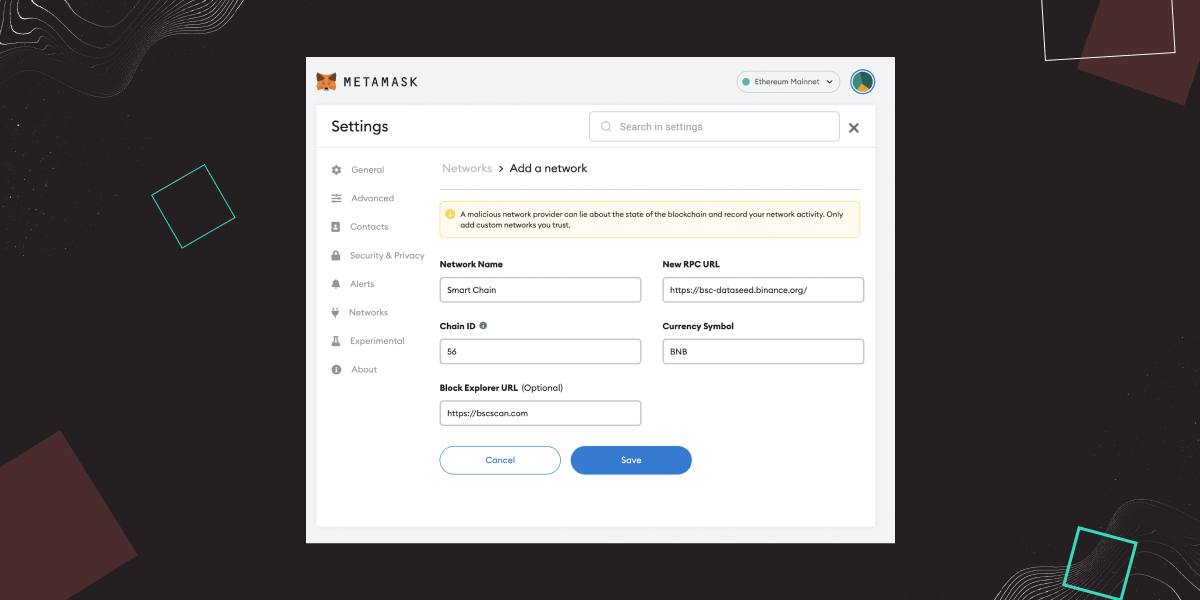
- Once you are redirected to the Add a network page in MetaMask settings fill in the form with the following details:
- Network Name: Smart Chain
- New RPC URL: https://bsc-dataseed.binance.org/
- Chain ID: 56
- Symbol: BNB
- Block Explorer URL: https://bscscan.com
Once you click “Save” – you’re finished with adding the BSC network to MetaMask. Now let's move on to the Polygon network adding process.
How to Add Matic Network to MetaMask: Exemplified by bitoftrade
As Binance Smart Chain, Polygon network provides its users with extremely fast transactions and allows them to trade with the low gas fees. That is why it’s worth adding Matic network to MetaMask.
The process is pretty much the same as adding the Binance Smart Chain network to MetaMask. Still, to better understand, bitoftrade exchange prepared a short video about how you can connect the Polygon network to your MetaMask wallet, so enjoy watching.
This process becomes even easier if you are trading with bitoftrade, and you’ll know why a bit later, so keep on reading.
Is MetaMask Safe to Use?
MetaMask wallet is crucial for your DeFi experience, and it's fantastic that it's perfectly safe to use. Rarely who complain about losing assets or being hacked. But, again, the safety of your assets is entirely dependent on how secure you store your seed phrase that serves as a private key to your wallet.
Nevertheless, the fact that MetaMask is a hot wallet, and connected to the Internet, makes it vulnerable to thefts, phishing attacks, and hackers so they can get a piece of your pie.
So if you're still concerned about losing your assets, you should consider transferring your money from MetaMask to a hardware wallet. Even MetaMask advises investors with a larger portfolio to keep the majority of their assets in a hardware wallet.
Is MetaMask Anonymous? We know that anonymity is a key point to bitoftrade users, so we can’t skip the question of whether MetaMask anonymous or not.
This wallet doesn’t have access to your personal information. However, we can’t say the same cannot about the browser you use. Since you need to install a browser extension to use MetaMask wallet, and every browser collects personnel data, we can’t say that MetaMask is fully anonymous.
However, since MetaMask is a Hierarchical Deterministic (HD) wallet, you can create new addresses for every transaction. Therefore, no one will be able to trace them.
How Much is MetaMask? MetaMask Cost
If you are wondering about the MetaMask price, it’s your lucky day! You should pay nothing. MetaMask wallet is an absolutely free-to-use web extension and mobile app so you can feel free to install them by following the link metamask.io.
MetaMask Fees
To perform any transactions on the Ethereum network, you'll need to pay gas. No matter how you interact with Metamask: swap, trade, and store ETH-based tokens or NFTs, or do anything else on the blockchain, you must pay gas fees on MetaMask for that computations. The native token of a specific network is the currency of gas fees, for instance, ETH for Ethereum network, MATIC for Polygon, BNB for Binance Smart Chain, etc.
If you’d like to clarify current gas fees MetaMask conditions, just use the following links:
- etherscan.io for Ethereum network gas conditions.
- bscscan.com for Binance Smart Chain network gas conditions.
- Polygonscan.com for Polygon network gas conditions.
- Ftmscan.com for Fantom network gas conditions.
- Avascan.info for Avalanche network gas conditions.
MetaMask Pros and Cons
When we are finished with MetaMask reviews, we can outline this wallet's main dos and don'ts.
Pros:
- Being a free extension for a web browser or free to use the mobile app, MetaMask is available to one and all;
- Due to its user-friendly and initiative UI, MetaMask is extremely easy to install and use;
- It provides a high-security level because of its encryption technology, the Secret Backup phrase, and constant updates from developers that make your MetaMask wallet harder to hack.
- MetaMask supports ERC-20 enabling interaction with Ethereum dApps, and supports BEP-20 tokens in Binance Smart Chain (BSC).
Cons:
- As we mentioned before, the MetaMask wallet can be hacked, particularly if the browser is hacked.
- Sometimes the network is overloaded, that is why it takes a while to confirm the transactions
- Weigh the advantages and disadvantages and decide if MetaMask is worthy to use.
How to Connect MetaMask Wallet to bitoftrade
MetaMask is one of the most popular multi-chain wallets out there. It allows you to connect all networks to trade on bitoftrade, enabling you to enjoy our innovative features including swap tokens, leverage, and limit trading directly and securely from your browser.
To connect your MetaMask Wallet to bitoftrade just follow the simple steps from the video.
By the way, when you’re finished with connecting of MetaMask wallet to bitoftrade, adding new networks to MetaMask got even easier.
We will prove this by adding the Polygon network to MetaMask as an example.
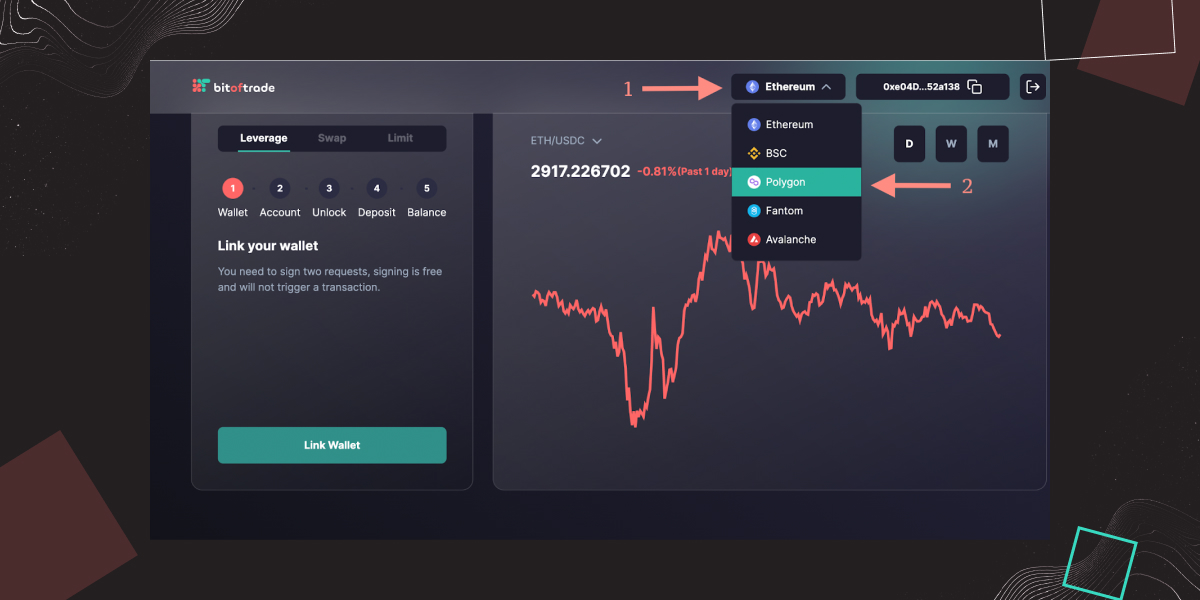
- Go to bitoftrade and click on the current network, Ethereum, in our case.
- Then find Polygon network in the drop-down menu and click on it.
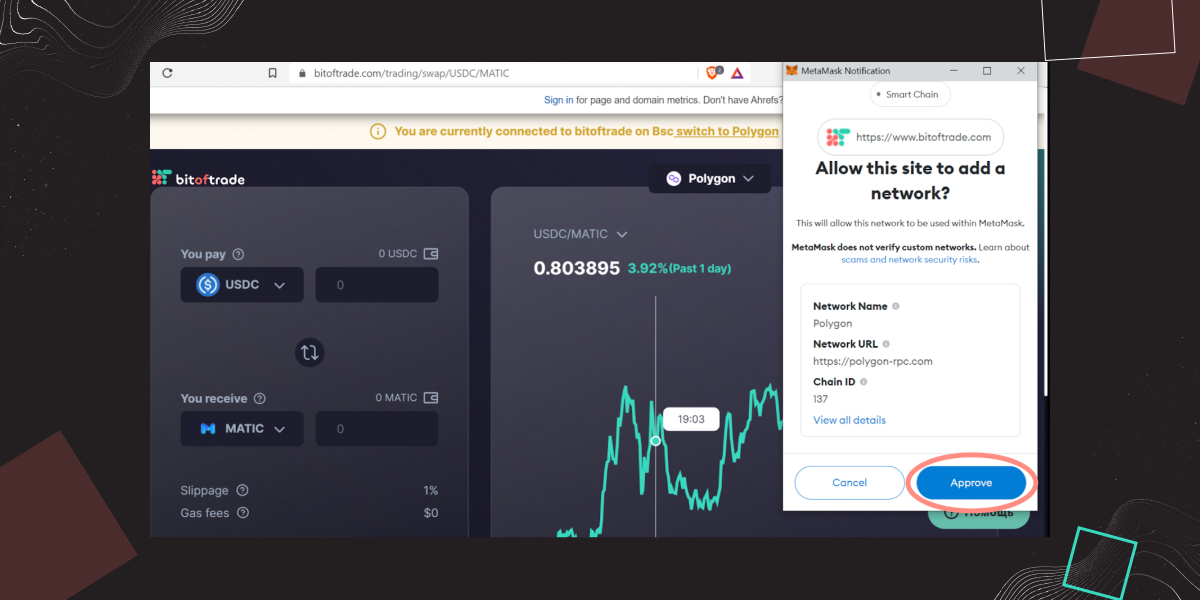
- Once you click on Polygon, Metamask automatically prompts you to add the chosen network to your wallet.
- When you click “Approve” you are all set.
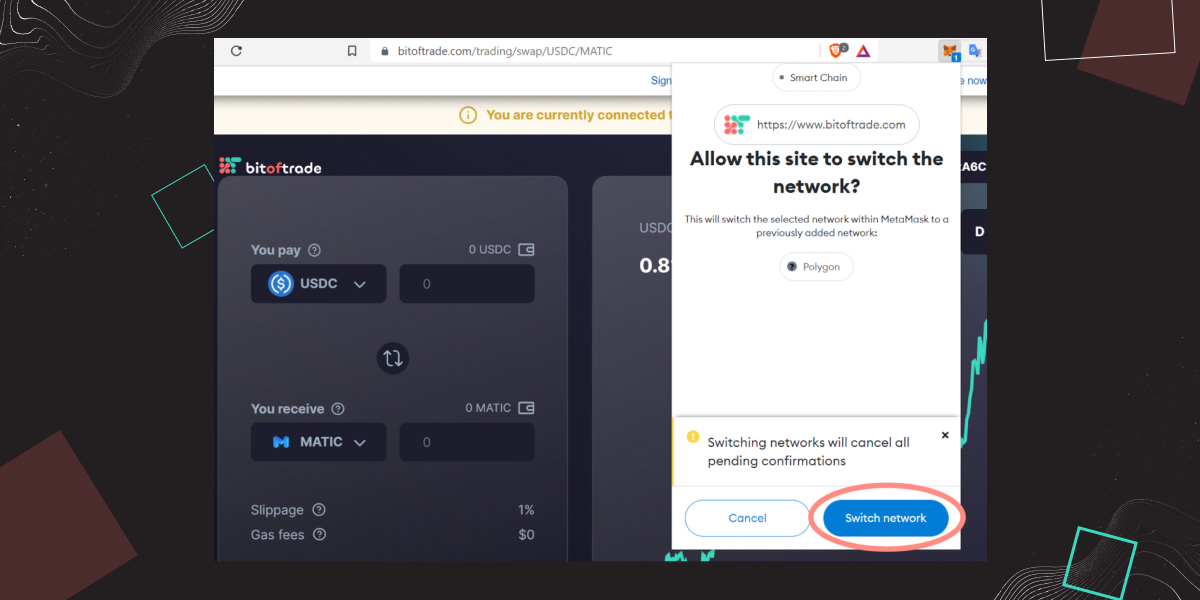
The final touch is to allow bitoftrade to switch the network within MetaMask to add the Polygon network with the "Switch network" button.
Now your MetaMask wallet is ready, and you can start trading on the Polygon network!
As you can see, we at bitoftrade always take care of our users and strive to provide them with the best and most intuitive trading experience.
Conclusion
MetaMask is a decentralized web 3.0 crypto wallet for the Ethereum ecosystem that allows you to buy, store, send, and swap all ERC-20 tokens and makes it possible to connect all of your wallets to DEXs such as bitoftrade.
In fact, bitoftrade is a new way to trade crypto without the KYC process, providing users with an experience of trading with a wide variety of trading features and tools typically available only on centralized exchanges. Leverage trading, stop limit and take profit orders with various technical indicators that are coming in the nearest future are accessible to everyone. So it's no matter if you're a novice or an experienced trader, all and one may benefit from trading on the bitoftrade exchange and boost their chances to gain.
To start trading with bitoftrade, connecting your MetaMask Wallet to the platform is a must! So install MetaMask by following our instructions and start your profiting crypto journey with no delay!